

A kitchen gets cluttered when things have no fixed place to go back to, and the right organizers give them one. This guide to Japandi kitchen organization goes through the kitchen zone by zone, from the upper cabinets down to the space beside the fridge. For each zone, these Japandi kitchen storage ideas list what to buy, how to measure for it, and how to keep the result calm and open.
1. Upper Kitchen Cabinet Organization: Dishes, Glasses and Spices

Upper cabinets clutter fast because everything ends up stacked on everything else. The fix is to give each category its own layer: an extra shelf for short jars, hooks for mugs, a step riser for spices, a turntable for oils and a stand for the platter. Then you can take one item without moving three others. For the complete picture, explore our full guide: The Ultimate Japandi Bedroom Guide: Ideas Decor and Styling Tips.
- An extra shelf for short jars. Most upper cabinets have a column of shelf-pin holes and only two or three shelves. A matching extra shelf on four pins creates a low layer for short jars of dried herbs, lentils or nuts, which would otherwise waste a full-height shelf. Kitchen storage for dishes and glasses then gets its own shelves below, with glasses in one row and plates beside the bowls, never under them.
- Under-shelf mug hooks. A clip-on rack slides onto the shelf above and hangs mugs by their handles. Kitchen storage for cups works better hanging: rims don't chip from stacking, and you take one mug without lifting another.
- A three-step riser for spices. Tiered risers put every spice jar in view, so nothing hides in the back row. Use one size of glass jar with a blank kraft tag, and keep kitchen storage for spices in a cabinet away from the stove, because heat and steam make them lose flavor faster.
- A turntable for oils and jars. A bamboo turntable brings the back of a deep shelf to the front, so bottles never get pushed out of reach. A two-tier turntable doubles the space in the same footprint.
- A plate stand for the platter. A large platter laid flat takes a whole shelf. Stood upright in a wooden stand, it takes a quarter of one. For several platters and boards, use a vertical rack with slots.
- Flat adhesive hooks inside the doors. Measuring spoons and cups hang on the inside of the door. Keep anything mounted there under an inch deep, place it between shelf heights, and keep shelf items about 2 inches back from the front edge, so the doors still close.
- Under-cabinet racks. The underside of the cabinet holds a stemware rack for wine glasses or a clip-on basket for tea towels. Leave at least 10 inches clear above the counter so you can still work beneath it.
Most organization ideas for kitchen cabinets stop at the shelves; the doors and the underside are the storage most kitchens never use.
Every category gets its own layer, and nothing sits on top of anything else.
2. Backsplash Storage Between the Upper and Lower Cabinets

The wall between the counter and the upper cabinets is the biggest unused storage space in most kitchens. Keep the wall behind the stove clear for heat and splatter, and turn the stretch beside it, over the prep counter, into the working wall. Then mount the organizers for each job where that job happens. You'll find even more ideas in 10 Dark Japandi Bedroom Ideas for a Moody and Restful Atmosphere.
- A steel backsplash panel with a shelf, rail and knife bar. One steel panel holds three things in one piece: a shelf for the spices you cook with daily, a rail for pans and ladles, and a magnetic bar for knives. Mount it on the wall beside the stove, over the prep counter, not behind the burners, where heat and splatter would reach the spices, the handles and the knives. Choose matte black or brushed steel rather than mirror-polished, and measure the wall width between the stove and the next cabinet before buying.
- Adhesive wall racks for herbs and jars. Two slim racks stuck to the wall beside the panel, one above the other, hold dried herbs and small jars in single rows where you prep. No drilling, so they work for renters too.
- Rotating under-cabinet hooks for big tools. A hook that sticks to the underside of the upper cabinet spins 360 degrees and holds spatulas, wooden spoons, tongs and a whisk. The tools you grab most hang in the air instead of filling a crock on the counter.
- An under-cabinet paper towel holder. Mounted under the upper cabinet, it frees a whole corner of the counter.
- A wall basket by the sink. A matte black wire basket holds garlic, lemons or a roll of wraps off the counter, where they're easy to grab.
Keep one finish, matte black with wood, across every piece, and leave about a third of the wall bare. That's what keeps a full backsplash looking Japandi instead of busy.
Divide the backsplash by job, and the wall can hold a lot without looking crowded.
3. Kitchen Countertop Organization: What to Buy and What to Keep Out

Kitchen countertop organization works when you build up instead of out. Protect a clear prep stretch and a landing space beside the stove, then use organizers that add a second or third level in the corners and over appliances. The counter holds more, and still looks clear where you work.
- Protect the prep and landing zones first. Kitchen planning guidelines call for at least 12 inches of clear counter on one side of the cooktop and 15 inches on the other, plus a continuous prep area about 36 inches wide. Nothing lives there; every organizer below goes around those spaces.
- A rack over the microwave. An expandable matte black rack stands over a countertop microwave and turns the dead space above it into a shelf for a rice cooker, a kettle or a row of canisters, with side hooks for a towel or ladle. It's the simplest kitchen storage for small appliances that have to stay out. Measure the microwave's width, depth and height, and leave the ventilation gap its manual asks for above and around it.
- A three-tier corner shelf. The back corner is the hardest spot on any counter to use. A stepped wood and black-metal corner shelf holds oils, airtight canisters and small jars on three levels, with room for a lidded basket underneath.
- A bread box with a fruit tier. A two-level bamboo bread box keeps bread behind a fluted glass door and fruit in an open tray on top, in the footprint of one box. Bread and fruit get one home instead of three loose spots.
- Floating shelves on an empty wall. A bare stretch of wall above the counter, often next to a window where a cabinet would block the light, takes two slim floating shelves. Wrap them around the corner and they hold bowls, herb jars and canisters at eye level, while the wall color still shows between them.
- A lidded seagrass basket with sections. Tea bags, sweetener packets and snacks go into one woven basket with dividers. Close the lid and the counter shows one natural object instead of a pile of boxes.
- One family of airtight canisters. Whatever stays out lives in matching containers. Glass with bamboo or matte black lids suits Japandi better than clear plastic with printed labels.
Build up, not out: every organizer on the counter should add a level, not take more surface.
Price history tracked · tap to check current price on Amazon
 ✦ Editor's pick
Mobile Kitchen Wooden Island Cart with Storage
Price history · 16 weeks
 ✦ All-time low
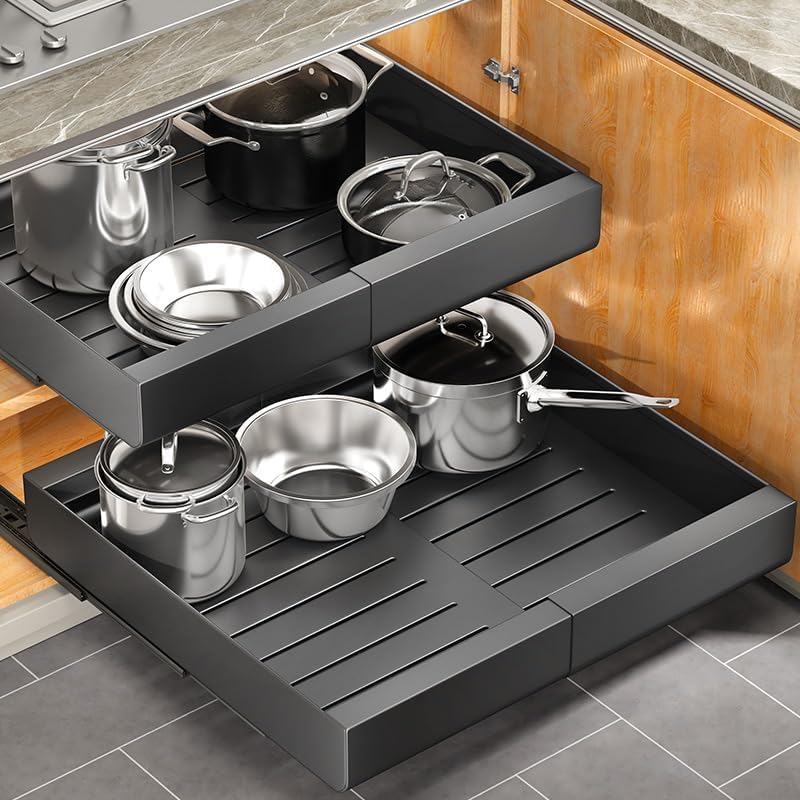
Pull out Cabinet Organizer, Expandable
Price history · 16 weeks
 ✦ Editor's pick
Under Sink Organizer, L-Shaped Pull Out Cabinet Organizer
Price history · 16 weeks
4. Lower Kitchen Cabinet Organization for Pots, Pans and Cutlery

Lower cabinets hold the heaviest things in the kitchen, and deep ones hide whatever ends up at the back. Stand pans on edge, put pots on a shelf that rolls out, and give skillets and cutlery their own slots. Then nothing gets stacked, and kitchen storage for pots and pans stops being a pile you dig through.
- An expandable bamboo pan and lid organizer. Frying pans and lids stand upright in slots, like files in a folder, so you pull out one without lifting the others. It expands to fit the cabinet. Measure the cabinet's inside width and the height between shelves, and check that the tallest pan handle clears the shelf above.
- A roll-out shelf on the cabinet floor. A roll-out slides forward like a drawer and brings the back of the cabinet to you, so stockpots and saucepans sit in one layer instead of being stacked. Measure the door opening at its narrowest point, past the hinges and the frame, and choose a shelf at least half an inch narrower. Many are sold for framed cabinets with a raising pad, so they clear the frame's lip.
- A tiered skillet rack in a deep drawer. Heavy cast-iron skillets stack on separate tiers, so the bottom one comes out without lifting the rest. A deep drawer is the right place for it, because the weight stays low and you see everything from above. Choose matte black over chrome, and measure the drawer's inside height before buying.
- A bamboo cutlery tray that fills the drawer. For kitchen drawer organization, give forks, knives, spoons and small utensils one slot each. Measure the drawer's inside width and depth and subtract a quarter inch, so the tray fits edge to edge and doesn't slide.
These kitchen storage solutions need few or no tools, so they work in rentals and move with you.
Heavy things go low and on edge, so you never lift one pan to reach another.
5. Kitchen Sink Organization Around the Faucet

The sink takes over the counter when dishes dry wherever there's space. An over-the-sink rack moves drying up and over the sink, and a caddy, a dispenser and a towel bar give everything else a fixed spot. The counter on both sides stays clear.
- An over-the-sink dish rack. A matte black two-tier rack stands on the counter on both sides of the sink and spans over it. Plates stand upright on the top tier, glasses and mugs go on the lower tier, and drips fall straight into the sink. Most come with a utensil cup and a cutting-board slot on the sides. Measure the sink's outer width, the counter space on each side for the legs, and the faucet's height, so the lower tier clears the spout. It also needs open wall above the sink, so it suits sinks under a window or without upper cabinets.
- A sponge and brush caddy with a drip tray. A matte black caddy beside the faucet holds the sponge, a dish brush and a bar of soap, and the tray catches the water underneath, so the counter stays dry and the sponge dries between uses.
- A ceramic soap dispenser. Refill it from the original bottle stored under the sink, so the counter shows one quiet object instead of a printed label.
- A towel bar on the sink cabinet. A slim bar on the front of the cabinet keeps the dish towel dry and within reach, and off the oven handle.
For more ideas around the sink, see the sink zone storage idea.
Dry dishes over the sink, not beside it, and the counter stays yours.
6. Under-Sink Kitchen Cabinet Organization That's Safe

The cabinet under the sink holds cleaning chemicals, so it needs to be safe before it's tidy. Put down a leak mat, fit two-tier organizers on either side of the pipe, keep a carry caddy on top and latch the doors. Then the space works, and nothing is a hazard.
- A leak mat. A waterproof mat with a raised edge covers the cabinet floor and catches drips before they swell the cabinet base. Cut it to the cabinet's inside width and depth.
- Two-tier pull-out organizers on either side of the pipe. Two slim units, one on each side of the drain, double the usable height and slide forward, so nothing hides at the back. Put the daily soaps and sprays on the top tier and the heavy jugs on the bottom, where they're easier to lift out. Measure the width on each side of the drain pipe, the height under the curved trap and the depth to the back wall. If your sink has a garbage disposal, measure around it too. Matte black suits a Japandi kitchen better than white.
- A handled caddy for the daily cleaning kit. A small wooden caddy on the top tier holds the scrub brush and sponges, so you carry the whole kit to the job and back.
- Child safety latches. Clip-in latches inside the doors keep children out of cleaners if children live in or visit your home.
Keep every cleaner in its original labeled container, because the label carries the ingredients and first-aid instructions poison control needs. Never pour cleaners into food or drink bottles, and never mix them, especially bleach with ammonia or acids.
Under the sink, safety comes before tidiness.
7. Kitchen Island Storage Ideas

A small island has two kinds of storage: the open end that faces the room and the drawers on the side you work from. Put a few calm, everyday things on the open end, keep the working tools in the drawers, and use the side panel for a towel. Each side then does one job.
- Open shelves on the end. Two or three shelves built into the island's end hold everyday bowls and a few cookbooks within reach of the table. Keep them to one or two things per shelf so the end reads as calm, not crowded.
- Woven baskets on the lower shelves. Seagrass baskets hide napkins, rolled towels and small things that look messy on their own. A lidded basket closes over anything you'd rather not see.
- Bamboo dividers in the island drawers. Island drawers sit right where you prep, which makes them the right home for a rolling pin, measuring cups, foil and baking paper. Give each one a slot, so nothing slides when the drawer opens. Measure the drawer's inside width and depth and subtract a quarter inch.
- A towel bar on the side panel. A slim bar on the side of the island keeps a dish towel within reach of the prep space and off the counter.
Leave about 3 to 4 feet of walkway around the island, so drawers and the oven door open without blocking the path.
On an island, the open end is for show and the drawers are for work.
8. Freestanding Kitchen Storage Racks and Carts

When the cabinets are full, an empty wall can take a freestanding rack and a rolling cart, with no renovation. In solid wood and matte black metal they look like furniture, not overflow, and together they can hold what a whole extra cabinet would.
- A wood and black-metal baker's rack. Five open shelves turn an empty wall into a pantry. Put the heavy things in the middle, at waist height: the stand mixer, mixing bowls and a microwave. Matching canisters go at eye level and lidded baskets on top. Check the shelf weight rating before loading appliances, leave the ventilation space the microwave's manual asks for, and anchor a tall rack to the wall so it can't tip.
- Matching airtight canisters on the open shelves. Rice, lentils, oats, pasta and flour in one family of glass canisters with bamboo lids look calm on open shelving; mixed packets don't. A blank kraft tag on each is enough.
- Separate baskets for potatoes and onions. The bottom shelf is cool and dark, the right spot for both. Keep them in separate ventilated baskets, because stored together, both spoil faster.
- A three-tier rolling cart. A slim cart beside the counter becomes a coffee station on top, a fruit tier in the middle and towels or baking supplies at the bottom. It rolls to wherever you're working and tucks back against the wall.
If you'd rather hide everything, a freestanding wooden pantry cabinet with doors does the same job behind closed fronts. Either way, leave wall showing around what you add; Japandi kitchen storage ideas work because there's open space around them.
Freestanding storage should look like furniture, not overflow.
9. Behind-the-Door and Fridge-Side Kitchen Storage

The back of the pantry door, the pantry floor and the side of the fridge are three of the most overlooked storage spots in any kitchen. An over-the-door organizer, a rolling bulk bin and a few magnetic racks add storage without taking any counter or cabinet space.
- An over-the-door pantry organizer. A matte black rack hangs from hooks over the top of the door and holds six shallow baskets: spices at eye level, oils and jars in the middle, wraps and snacks below. Measure the door's thickness for the hooks, the gap between the door and the frame, and the space between the closed door and the pantry shelves, so the baskets still let it close. Keep the rack narrow enough to clear the handle.
- A rolling bulk bin on the pantry floor. Heavy bags of rice or flour go into a lidded bin on casters, so you roll it out and scoop instead of lifting a sack down from a shelf. A large lidded seagrass bin beside it holds bulk paper goods or bottled water.
- A slim folding step stool. It hangs or leans in the pantry, so the top shelves are easy to reach and the baskets up there actually get used.
- Magnetic racks on the side of the fridge. If the side of your fridge is exposed, magnetic shelves hold spices, wraps and a paper towel roll. Test the side with a magnet first, since some fridge sides aren't magnetic, and keep racks clear of any vents. The blank side at the end of your run idea shows the same trick on a cabinet side.
- A slim rolling cart beside the fridge. A narrow cart on wheels slides into the gap between the fridge and the wall for cans and bottles. Measure the gap and leave the airflow space your fridge's manual asks for.
The best new storage space is usually a surface you've stopped noticing.
Frequently Asked Questions
What is the first step in Japandi kitchen organization?
Measure before you buy. Go through each zone in this guide, measure every cabinet opening, drawer and gap, and write the sizes down. Then buy only what fits. Kitchen organization ideas that start with shopping usually end with more clutter.
What materials suit Japandi kitchen storage?
Wood, bamboo, glass, ceramic, natural fiber and matte black metal. Keep colored plastic and white wire inside closed cabinets, or skip them. Minimal kitchen organization works when what's visible is made of a few honest materials, the same idea behind Japanese kitchen storage solutions.
How do I organize a kitchen on a budget?
Start with the cheapest fixes: drawer dividers, a shelf riser and a tension rod under the sink. Add roll-out shelves next, and buy matching containers last, once you know how much space you have. Kitchen organization on a budget is mostly about buying in the right order.
Where to Start
Pick the zone that bothers you most, measure it, and buy for that zone only. Good kitchen storage and organization is built one zone at a time, and that's how Japandi kitchen organization stays calm instead of crowded.
More Japandi Kitchen Guides
Comments