

Your counter is full. Your cabinets are full. Yet your small Japandi kitchen still has unused inches hiding in plain sight: under the base cabinets, beside the fridge, behind every door, and buried in the corner where two walls meet. This article isn't about making a cramped kitchen look calmer with cream paint and fewer bowls. It's about finding actual space in the dead zones almost every small kitchen has.
Each of the 10 ideas below targets one zone, tells you how many inches it holds, and shows you how to use it without losing the calm Japandi feel. These are kitchen ideas for small spaces Japandi-style: practical first, never cluttered. Every idea is tagged Renter-friendly or Small renovation, so you know instantly what applies to you. For the full picture on layout, color and materials, start with The Ultimate Japandi Kitchen Guide. This one covers how to maximize kitchen storage, with the Japandi kitchen storage ideas that work hardest in a Japandi kitchen small space. For the complete picture, explore our full guide: The Ultimate Japandi Bedroom Guide: Ideas Decor and Styling Tips.
1. Toe-Kick Drawers in the 4 Inches Under Your Base Cabinets

Zone: Toe-kick | Space reclaimed: ~4 in tall × 20 in deep under every base cabinet | Type: Small renovation | Effort: Hire a carpenter (or a skilled DIYer)
Renters: Ask your landlord first. Some will agree if you restore the toe-kick when you move out.
What Actually Fits in 4 Inches
Baking sheets, cooling racks, serving trays and placemats all fit here. It's the most overlooked kitchen storage for baking sheets in the room, and the best kitchen storage for cookie sheets you'll ever get without adding a cabinet. Inside, expect about 3 inches of usable height, enough for flat pans stacked two or three high. You'll find even more ideas in 10 Dark Japandi Bedroom Ideas for a Moody and Restful Atmosphere.
Check what's behind the toe-kick before you start. Under the sink and dishwasher, plumbing usually rules it out.
Keeping It Hidden, Not Gimmicky
Use push-to-open fronts in the same wood as the toe-kick, so the drawer is invisible when closed. Think of it as the kitchen version of a secret cabinet door: hidden storage that nobody notices until you open it.
The most useful 4 inches in a small kitchen are the ones you've been kicking for years. Keep it to one drawer per run so the base line stays clean and unbroken.
Tell your carpenter: 4-inch-tall toe-kick drawers, 20 inches deep, on full-extension slides with push-to-open latches, fronts in the same white oak as the kick plate. Skip the sink and dishwasher bays.
Complete the Look
- Main + secondary color: Deep olive matte lower cabinets + soft charcoal-gray upper cabinets
- Wood tone: White oak toe-kick drawers (shown open)
- Hardware: Slim bronze edge pulls
- Walls: Warm white plaster
- Countertop + backsplash: Honed white quartz, cream handmade tile
- Lighting: 2700K under-cabinet LED + one ceramic dome pendant
- Decor: A stoneware crock of wooden spoons, a small olive tree in a clay pot
- Flooring: Honey oak planks
Price history tracked · tap to check current price on Amazon
 = Price stable
3 Piece Kitchen Cabinet Door Storage Box
Price history · 16 weeks
 ✦ Editor's pick
Luxury Bamboo Kitchen Drawer Organizer
Price history · 16 weeks
 ✦ All-time low
2 Packs Under Sink Pull-Out Storage Organizers
Price history · 16 weeks
2. A 6-Inch Pull-Out Pantry in the Gap Beside the Fridge

Zone: Fridge gap | Space reclaimed: 6–9 in wide × counter height or taller | Type: Small renovation (built-in) or Renter-friendly (freestanding slim rolling unit) | Effort: Weekend DIY
Renters: A freestanding slim rolling cart slides into the same gap with no installation.
Measuring the Gap You Didn't Know You Had
Measure the clear space between the fridge and the wall or cabinet beside it. Most fridges leave between 2 and 9 inches. A built-in pull-out needs at least 6 inches to be worth building. Most freestanding slim carts need 7 to 8 inches, so measure before you order. Under 6 inches, the gap still holds baking trays standing on edge.
This is one of the best kitchen food storage ideas if you have no pantry cabinet at all.
Filling It: Spices, Oils, Cans
Arrange by height: oils and the tallest bottles at the bottom, cans in the middle, spices at the top. It doubles as kitchen storage for bottles that are too tall for any upper shelf. Decant into matching glass jars so the unit reads calm when it's pulled open.
A 6-inch gap can hold as much as an upper cabinet, and you see every item at once. Among all the storage ideas for kitchen spices, this is the one that ends the "buried at the back" problem for good.
Complete the Look
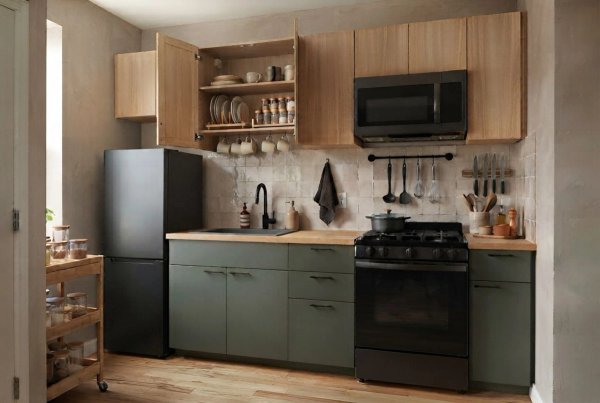
- Main + secondary color: Natural ash cabinets + rust terracotta zellige backsplash
- Wood tone: Natural ash with visible grain, with the pull-out face matching the cabinets (shown pulled open)
- Hardware: Matte black slim bar pulls
- Walls: Soft sage-gray limewash
- Countertop + backsplash: White oak butcher block, rust zellige tile
- Key furniture: Apartment-size top-freezer fridge in matte stainless with a compact black microwave in an open cubby above, matte black 24-inch range with a slim black hood
- Lighting: Under-cabinet LED + one round white paper lantern pendant
- Decor: Glass spice jars, oils and cans in the pull-out, a linen tea towel, a cutting board and a crock of wooden spoons
- Flooring: Light concrete-look tile with a jute mat
3. One Walnut Rail Across the Backsplash

Zone: The 18 inches between counter and upper cabinets | Space reclaimed: A full wall of hanging storage with zero depth | Type: Renter-friendly (a few screws, easy to patch) | Effort: Weekend DIY
Renters: Drill through the grout lines, not the tile faces, and fill the holes with matching grout when you move out.
One Rail, Not Five Gadgets
A single walnut or matte black rail holds S-hooks, a ceramic utensil cup, a linen towel and a small pan. Of all the storage ideas for kitchen utensils, this frees the most drawer space, and it's ideal kitchen storage for big utensils like ladles and tongs.
It's one of the most effective small kitchen storage hacks for space because it uses the one wall zone that's almost always empty. In a small black Japandi kitchen, a matte black rail disappears into the darker cabinets and lets the walnut knife strip stand out.
A Knife Strip in the Same Line
Mount a wooden magnetic knife strip at exactly the same height as the rail, so the two read as one continuous line. It's the simplest form of Japanese kitchen knife storage: blades off the counter, out of the drawer, and in reach.
Storage at eye level only looks calm when it follows one straight line. Two rails at two heights is where it starts to look busy.
How to Do It: Backsplash Rail
Tools: stud finder, level, drill with a masonry bit, wall anchors | Time: about 1 hour | Skill: 2/5
1. Mark a level line about 4–6 inches above the countertop. 2. Find the studs. Use them for the brackets, or heavy-duty wall anchors between them. 3. Mark the bracket holes on grout lines where you can, drill slowly with a masonry bit, and mount the rail. 4. Mount the knife strip on the same line, measured from the same mark. 5. Hang no more than five or six pieces.
Complete the Look
- Main + secondary color: Matte black cabinets + charcoal vertical tile, lifted by a white counter and warm wood
- Wood tone: Walnut utensil rail and a matching wooden magnetic knife strip, plus one white oak open shelf in place of uppers
- Hardware: Matte black slim pulls
- Walls: Soft warm gray plaster
- Countertop + backsplash: White marble-look quartz, charcoal vertical stacked tile
- Lighting: LED strip under the open shelf
- Decor: Linen towel and ceramic utensil cup on the rail; plates, glass jars, mugs, oil and vinegar and a pothos on the shelf; a two-tier matte black spice rack on the side wall, aligned with the rail; a matte black sink caddy with a natural sponge, wooden brush and amber soap; a cutting board and a bowl of lemons
- Flooring: Light oak with a jute mat
4. The Blank Side at the End of Your Run

Zone: The fridge side or cabinet end panel | Space reclaimed: A full column of storage, only 4–5 in deep | Type: Renter-friendly | Effort: Weekend DIY
Renters: On a fridge side, use magnetic racks with no tools at all. On a cabinet end panel, the screw holes are small and easy to fill when you move out.
Fridge Side or Cabinet End: What Works on Each
Almost every small kitchen run ends in a blank, flat surface: the side of the fridge or the end panel of the last cabinet. It's one of the most overlooked spots for kitchen end cap storage, and one of the easiest kitchen hacks for storage cabinets because nothing has to be built.
A fridge side takes magnetic racks. The side panels are usually painted steel, so magnets hold even on many stainless fridges. A cabinet end panel takes the same wire baskets screwed in. Once a basket holds glass jars, skip adhesive strips; they won't take the weight.
Keeping It Tidy: One Column, Matching Baskets
Use one paper towel holder at the top and three identical matte black baskets below it, lined up in a single column with even gaps. Put oils and seasoning in the top basket, matching jars of rice, pasta and oats in the middle, and foil and parchment in the bottom.
A blank side panel only looks calm when everything on it matches and lines up. Mixed racks at random heights read as clutter. One column of matching baskets reads as built-in kitchen cabinet storage ideas, without the cabinet.
How to Do It: End-of-Run Baskets
Tools: magnet or tape measure, level, drill and short screws (for a cabinet panel) | Time: about 45 minutes | Skill: 1/5
1. Check the surface. Hold a fridge magnet against the fridge side; if it sticks, use magnetic racks. For a wooden end panel, use screw-mounted baskets. 2. Measure the walkway. The baskets stick out 4–5 inches, so skip this if the panel faces a doorway or a tight path. 3. Mark one vertical line so every basket's left edge lines up. 4. Mount the paper towel holder at the top, then the three baskets below with equal gaps, checking each with a level. 5. Load heavier items in the lower baskets and leave a strip of clear panel at the bottom.
Complete the Look
- Main + secondary color: Mid-tone warm greige matte cabinets + deep indigo square tile backsplash
- Wood tone: Oak butcher block counter
- Hardware: Small matte cream ceramic knobs, matte black wire baskets and paper towel holder
- Walls: Linen white
- Countertop + backsplash: Oak butcher block, deep indigo square matte tile
- Key furniture: Dark stainless apartment-size fridge, white 24-inch range, stainless over-the-range microwave
- Lighting: Under-cabinet LED + one woven rattan pendant
- Decor: Olive oil, vinegar, a salt crock and a pepper mill; matching glass jars of rice, pasta and oats; plain kraft boxes of foil and parchment
- Flooring: Smoked oak wide planks with a jute runner
5. A Pull-Out Cutting Board That Doubles Your Prep Space

Zone: One base cabinet | Space reclaimed: ~18 × 24 in of extra work surface | Type: Small renovation (or Renter-friendly with an over-sink board) | Effort: Hire a carpenter
Renters: An over-sink cutting board adds prep space with no installation.
Turning a Base Cabinet Into a Countertop
A 1.5-inch end-grain walnut board forms the top of a pull-out base cabinet, sitting just below the countertop line. It's kitchen counter storage hidden in plain sight, and the most useful extra storage small kitchen owners never think to build.
Storing the Boards You Already Own
Below the board, the same pull-out holds vertical dividers. Every other board, tray and sheet pan stands upright there, so one pull brings out your prep surface and all your boards together.
The best extra counter in a small kitchen is the one that disappears when you're done. Slide-out board above, upright slots below: that pairing is complete kitchen storage for cutting boards.
Tell your carpenter: Convert one base cabinet into a full-extension pull-out, with a 1.5-inch end-grain walnut board as its top, set 1/2 to 1 inch below the countertop, and vertical dividers below it for boards and sheet pans. Use heavy-duty slides rated for the weight.
Complete the Look
- Main + secondary color: Soft sage green lower cabinets + dark smoked oak upper cabinets
- Wood tone: Dark smoked oak uppers, end-grain walnut pull-out board (pulled out, with chopped vegetables on it)
- Hardware: Small brass edge tabs
- Walls: Bone, with a warm terracotta clay limewash on the end wall
- Window: Small window at the end of the galley
- Countertop + backsplash: Charcoal microcement carried up the wall
- Lighting: Under-cabinet LED + one linen drum pendant
- Decor: A bowl of lemons, an amber soap bottle, chopped vegetables on the board
- Flooring: Pale stone-look porcelain
6. A 24-Inch-Deep Island With Storage on One Side, Stools on the Other

Zone: The middle of a narrow open-plan kitchen | Space reclaimed: Storage and seating in 24 in of depth (a standard island is 36 in or more) | Type: Small renovation (fixed) or Renter-friendly (drop-leaf table) | Effort: Hire a carpenter
Renters: Use a small freestanding walnut drop-leaf table with a storage shelf underneath instead. Fold the leaves down when you need the walkway; the shelf still holds pans and linens.
The Clearance Rule
This one is for kitchens that open into the living room; in a closed galley, skip it. Measure first. You need at least 36 inches of walkway on the working side. Without it, skip this idea: a narrow island in a tight galley is a hazard, not a Japandi kitchen with storage.
Open Shelves on the End, Knees on the Side
Skip the drawers. The end of the island that faces the kitchen gets two open walnut shelves: a slotted rack with glass lids standing upright and matching pans on top, bowls and a stockpot below. One type of item per shelf keeps it calm, and it's the neatest fix for glass lid storage kitchen organization headaches. That's Japandi kitchen island storage you can reach without opening anything.
The top overhangs 10–12 inches along the side facing the living room, so two backless stools tuck underneath. Together, that's a kitchen island with storage and seating in a footprint most kitchens can spare. Think of it as a high table kitchen storage solution that also serves dinner for two.
A narrow island only works if the stools disappear underneath it. Any stool with a back sticks out into the walkway, and that's what makes a small Japandi kitchen island feel in the way.
Tell your carpenter: A 24-inch-deep walnut island with two open shelves on the end facing the kitchen, a 10–12-inch overhang along the seating side supported by hidden steel brackets, and the base anchored to the floor. Keep 36 inches clear on the working side.
Complete the Look
- Main + secondary color: Dark slate-gray cabinets + walnut island with sage linen stool cushions
- Wood tone: Walnut island and open shelves, light oak stools
- Hardware: Brushed steel faucet, slim dark pulls
- Walls: Warm gray plaster
- Countertop + backsplash: Honed travertine counter and backsplash, dark walnut island top
- Key furniture: Two backless oak stools; stainless range, over-the-range microwave and apartment-size fridge
- Lighting: One long linear black pendant over the island, under-cabinet LED, a small LED inside the island shelves
- Decor: A green branch in a stoneware vase, dinner for two on the island, one framed abstract print in muted earth tones above the stools, a sage linen sofa with a rust cushion in the living room
- Flooring: Light oak planks with a jute rug
7. 12-Inch-Shallow Cabinets on the Second Wall of a Galley

Zone: The opposite wall of a galley | Space reclaimed: ~12 in of walkway width without losing storage | Type: Small renovation | Effort: Hire a carpenter
Renters: A shallow freestanding shelf unit, anchored to the wall with two brackets, gives a similar result.
Why Shallow Holds More Than You'd Think
At 12 inches deep, plates, glasses and cups sit in a single row, all visible. It's the most underused Japandi kitchen storage cabinet idea for galley layouts, and the cleanest kitchen storage for plates and kitchen storage for glasses you can build.
Lowers, Uppers and a Shallow Counter
Shallow lowers carry a 12-inch walnut counter on top. Use it as a coffee station. Above it, a shallow open plate rack holds plates on edge and a row of glasses, with matching shallow cabinets beside it, turning the second wall into kitchen extra storage cabinets that never crowd the walkway.
Half-depth cabinets give you back the walkway and still hold every plate. This is Japandi storage, kitchen-sized: two working walls, and a galley that no longer feels like a corridor.
Tell your carpenter: 12-inch-deep base and wall cabinets on the second wall, a 12-inch walnut top on the lowers, and one open plate rack section in the wall cabinets, all screwed into studs. Match the door style to the main run.
Complete the Look
- Main + secondary color: Deep forest green lower cabinets + soft sage upper cabinets on both runs
- Wood tone: Walnut coffee counter on the shallow side
- Hardware: Unlacquered brass knobs and faucet
- Walls: Warm putty, with a charcoal backsplash wall on the shallow side
- Countertop + backsplash: Cream quartz and charcoal tile on the main run, walnut counter on the shallow side
- Storage detail: Open plate rack with plates on edge and a row of glasses
- Key furniture: Stainless range, over-the-range microwave and narrow apartment-size fridge
- Lighting: One brass-trimmed flush-mount ceiling light + under-cabinet LED
- Decor: A stainless kettle, two terracotta mugs and a jar of coffee beans; a glimpse of an oatmeal sofa and a trailing plant through the doorway
- Flooring: Light oak planks with a charcoal woven runner
8. The Sink Zone: Over, Front and Under

Zone: The sink cabinet | Space reclaimed: Drying space over the sink, a 2 in tip-out tray, and two tiers under the sink | Type: Renter-friendly | Effort: Weekend DIY
Renters: Everything here comes out when you move. The tip-out tray needs only a few small screws in the false front.
Over and In Front of the Basin
A matte black roll-up drying rack unrolls across the sink or on the counter beside it, then rolls up and slides into a drawer once the dishes are dry, so there's no permanent dish rack taking up counter space. A tip-out tray fitted to the false panel in front of the sink adds a slim 2-inch pocket for spare sponges and a scrub brush. Add a slim sink caddy pressed against the faucet base for the sponge, brush and soap. Together they claim the spots almost every sink leaves empty.
Under the Sink, Around the Pipes
A two-tier sliding organizer shaped around the plumbing gives you kitchen storage for cleaning supplies on two levels. Of all the under sink storage ideas for kitchen cabinets, this is the one that turns the most awkward cupboard into a usable one.
The sink is the hardest-working zone in a small kitchen, so give it storage on three sides. Treating over, front and under as one system is the heart of Japanese small kitchen storage: every inch of the sink zone gets a job.
How to Do It: Tip-Out Tray
Tools: screwdriver, drill, tape measure | Time: about 1 hour | Skill: 2/5
1. Open the sink cabinet and look behind the false front (the fixed panel above the doors) for clips or screws. 2. Remove the panel from the inside. If it's glued in place, stop here and skip the tray. 3. Measure the panel and buy a tip-out tray kit that fits, with hinges included. 4. Screw the hinges to the panel and the cabinet frame, then attach the tray to the back of the panel. 5. Rehang the panel and check that the tray tips out without hitting the sink.
Complete the Look
- Main + secondary color: Bone cabinets + charcoal slate backsplash tile
- Wood tone: Oak open shelf beside the window
- Hardware: Matte black gooseneck faucet, pulls, roll-up rack, sink caddy and under-sink organizer
- Walls: Stone-gray limewash
- Countertop + backsplash: Honed limestone, charcoal slate tile
- Sink: White fireclay single bowl
- Window: Small window with a natural linen Roman shade
- Key furniture: Stainless range and over-the-range microwave
- Lighting: Daylight from the window
- Decor: Amber glass soap bottle, wooden dish brush, a potted herb, a deep olive linen towel on the range handle, folded linen cloths under the sink
- Flooring: Pale oak with a jute mat
9. A Corner Appliance Garage for Everything You Use Daily

Zone: The back corner of the countertop | Space reclaimed: 2–3 ft of counter the appliances used to occupy | Type: Small renovation (or Renter-friendly freestanding version) | Effort: Hire a carpenter (and an electrician for the outlet)
Renters: A freestanding appliance cabinet does the same job with no carpentry. Plug it into an existing outlet behind the cabinet.
Which Appliances Earn a Spot
The air fryer, toaster and coffee maker, and only those three. Have an electrician add an outlet inside the garage so the appliances never come out. Most air fryer storage ideas in kitchen layouts fail because the machine drifts back onto the counter; an internal outlet ends that. Always open the door fully while an appliance is running, because air fryers and toasters need open air around them.
Lift-Up or Tambour Door?
A lift-up door suits shallow corners and needs only a few inches of clearance above. A tambour (rolling slatted) door is better where upper cabinets leave little room. Either way, it's kitchen storage for appliances that stays out of sight.
Appliances only look clutter-free when they have a home they never leave. A walnut tambour door is the detail that makes kitchen appliance storage look built-in rather than improvised. It's also why this works so well in a Japandi kitchen small dark palette: the walnut door blends into the walnut cabinets, so the kitchen storage for small appliances simply vanishes.
Tell your carpenter: A corner appliance garage the full depth of the counter, with a walnut tambour or lift-up door and a gap at the back for airflow. Book a licensed electrician for the outlet; don't wire it yourself.
Complete the Look
- Main + secondary color: Dark walnut lower cabinets and appliance garage + pale clay upper cabinets
- Wood tone: Walnut tambour door rolled up, lit from inside, showing an air fryer, a toaster and a coffee maker
- Hardware: Small walnut knobs, matte black faucet
- Walls: Pale clay plaster
- Countertop + backsplash: Off-white quartz, dusty blush handmade clay tile
- Key furniture: Matte black range, over-the-range microwave and narrow apartment-size fridge
- Lighting: LED strip inside the garage + one pleated paper ceiling pendant
- Decor: A dusty blush ceramic bowl of lemons, a single green stem in a bud vase, a linen towel on the range handle
- Flooring: Pale limestone tile with a jute mat
10. A Two-Tier Turntable That Finally Uses the Corner Cabinet

Zone: The L-shaped corner | Space reclaimed: Up to 36 in of dead depth | Type: Renter-friendly (two-tier turntable) or Small renovation (V-shaped corner drawers) | Effort: Weekend DIY / hire a carpenter
Renters: A freestanding two-tier turntable sits inside the existing corner cabinet, with nothing to install.
Why the Corner Wastes So Much
Every L-shaped kitchen has a corner cabinet, and the back of it is where pots go to be forgotten. You can see the front third; the rest means kneeling on the floor and reaching blind. That dead depth is why kitchen storage for corner spaces is such a common frustration in a Japandi small corner kitchen.
The counter corner above it wastes space too. A small two-tier bamboo corner shelf fits right into that inside corner and holds spice jars that would otherwise crowd the counter.
Match the Turntable to Your Door
A round two-tier turntable spins the back of the cabinet to the front, so nothing gets lost. It's the easiest kitchen storage for corner cabinet interiors, and it works in any Japandi kitchen small L-shape without touching the cabinets. The shape depends on your door:
- Diagonal two-door front or L-shaped bi-fold door: a round turntable, sized to sit fully inside.
- Single flat door on a blind corner: a half-moon (kidney-shaped) pull-out instead, since a round one can't reach the hidden side.
A corner isn't dead space, just space you can't reach yet. Start with a turntable now, and upgrade to corner drawers if you ever renovate.
How to Do It: Corner Turntable
Tools: tape measure | Time: about 20 minutes | Skill: 1/5
1. Empty the corner cabinet completely. 2. Measure the door opening, the interior depth and the height between the cabinet floor and any shelf. 3. Choose a turntable 1–2 inches smaller than the door opening, so it fits through and sits fully inside with the doors closed. 4. Set it at the back of the cabinet and load heavy pots on the bottom tier, lighter bowls on top. 5. Spin it once fully loaded and close the doors to check nothing catches.
Tell your carpenter (for corner drawers): Replace the corner base unit with V-shaped corner drawers on full-extension slides, fronts matching the lower cabinets. It's a bigger job than standard drawers, because the whole corner unit changes.
Complete the Look
- Main + secondary color: Dark walnut lower cabinets + deep forest green walls and backsplash
- Wood tone: Dark walnut lowers, light oak uppers and open shelves, a bamboo turntable inside a diagonal two-door corner cabinet (shown open and lit)
- Hardware: Long brushed brass bar pulls, brushed brass faucet
- Walls: Deep forest green
- Countertop + backsplash: Honed white marble, deep green tile
- Storage detail: Three light oak open shelves with plates, bowls, mugs and matching glass pantry jars; a two-tier bamboo corner shelf with spice jars on the counter
- Key furniture: Stainless range, over-the-range microwave and narrow apartment-size fridge
- Lighting: LED strips under each open shelf and inside the corner cabinet
- Decor: A trailing pothos, a cutting board, a bowl of lemons, an amber soap bottle, a sage linen towel on the range handle
- Flooring: Mid-tone oak planks with a jute rug
Frequently Asked Questions
How do I maximize storage in a small Japandi kitchen?
Start with the dead zones: the toe-kick, the fridge gap, the blind corner and the backs of the doors. Knowing how to maximize kitchen storage means claiming those inches first, not buying more organizers for shelves that are already full. That's the core of kitchen storage for small kitchens.
What storage works in a rental kitchen?
The best kitchen storage for apartments needs no permanent changes. Door racks (idea 4), the sink zone (idea 8) and corner turntables (idea 10) all come out cleanly, and the backsplash rail (idea 3) needs only a few patchable screws. For a Japandi kitchen small apartment, the freestanding slim pull-out beside the fridge is the single biggest renter-friendly win.
Can a small kitchen have hidden storage and open shelves at the same time?
Yes. That balance is what defines a modern Japanese kitchen with open shelves and hidden storage. Give the open shelf only the pieces you use and love every day, and put everything else behind push-to-open fronts, appliance garage doors or toe-kick drawers.
Pick one zone, whichever renter-friendly idea fixes your biggest daily frustration, and start there. Don't attempt all ten at once. The best Japandi small kitchen designs are built one solved problem at a time, and kitchen storage ideas for small spaces work best when each change has time to settle before the next. When you're ready to choose the fronts, colors and hardware these ideas sit behind, 12 Japandi Kitchen Cabinet Ideas That Designers Keep Coming Back To covers every decision.
Comments